Weapons Playground 1-8: Difference between revisions
mNo edit summary |
No edit summary |
||
| Line 1: | Line 1: | ||
{{Level | {{Level | ||
|image=[[File:WeaponsPlayground.png|250px]] | |image=[[File:WeaponsPlayground.png|250px]] | ||
| Line 14: | Line 12: | ||
|map=<center style="image-rendering:pixelated;">[[File:WeaponsPlaygroundMap.png|120px]]</center> | |map=<center style="image-rendering:pixelated;">[[File:WeaponsPlaygroundMap.png|120px]]</center> | ||
}} | }} | ||
'''Weapons Playground 1-8''' is an [[Example Level]] created by [[JumpDashEvade]]. | '''Weapons Playground 1-8''' is an [[Example Level]] created by [[JumpDashEvade]]. | ||
| Line 21: | Line 18: | ||
== Walkthrough == | == Walkthrough == | ||
'''Hub Rooms:''' | '''Hub Rooms:''' | ||
The level starts in a hub that functions as a stage select. To the left are four challenges based on weapons from [[Mega Man and Bass]]. Above the starting room is four challenges based on weapons from [[Mega Man V]]. Finally, the four challenges on the right feature two from each. | The level starts in a hub that functions as a stage select. To the left are four challenges based on weapons from ''[[Mega Man and Bass]]''. Above the starting room is four challenges based on weapons from ''[[Mega Man V]]''. Finally, the four challenges on the right feature two from each. | ||
In this room, there are two [[Key Door]]s that require six [[Key]]s each. Once these are unlocked, the [[Energy Element]] will be free to collect. However, this requires clearing every weapon stage. | In this room, there are two [[Key Door]]s that require six [[Key]]s each. Once these are unlocked, the [[Energy Element]] will be free to collect. However, this requires clearing every weapon stage. | ||
Revision as of 23:20, 1 April 2025

| |||||||||||||||||||||||||
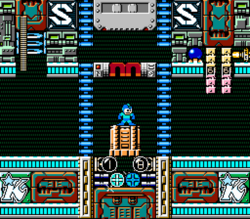
| If only Mega Man would think to push the box... | |||||||||||||||||||||||||
| |||||||||||||||||||||||||
Weapons Playground 1-8 is an Example Level created by JumpDashEvade.
This level focuses on showing various nuances of the weapons introduced in version 1.8.0.
Walkthrough
Hub Rooms: The level starts in a hub that functions as a stage select. To the left are four challenges based on weapons from Mega Man and Bass. Above the starting room is four challenges based on weapons from Mega Man V. Finally, the four challenges on the right feature two from each.
In this room, there are two Key Doors that require six Keys each. Once these are unlocked, the Energy Element will be free to collect. However, this requires clearing every weapon stage.
The final room of the hub is reached every time a stage is cleared, and exists only to reset the Music, Astro Gates, and On/Off Switchs.
Copy Vision: Upon entering, the player's health is set to 1, meaning Mega Man will die upon taking any damage.
This stage features Boobeam Rails to signal where Copy Vision must be used. First, the player must use it to fire at a Kakinbatank. Afterwards, after progressing past it, it must be used in front of, but facing away from, a Oshitsu Osarettsu. Following that, in the path of Steam to cool down some Hot Plates.
The final section is more complex. Upon reaching the Coltons, slide under them to the left side. Use Copy Vision to divert their aim to the right without despawning the copy. Climb the ladder, and create another copy to their right, diverting their aim again. Finally, create copies to defeat them and reach the end.


